Implementing a Secure and Scalable Hub-and-Spoke Network Topology in Azure with Terraform

hub-spoke

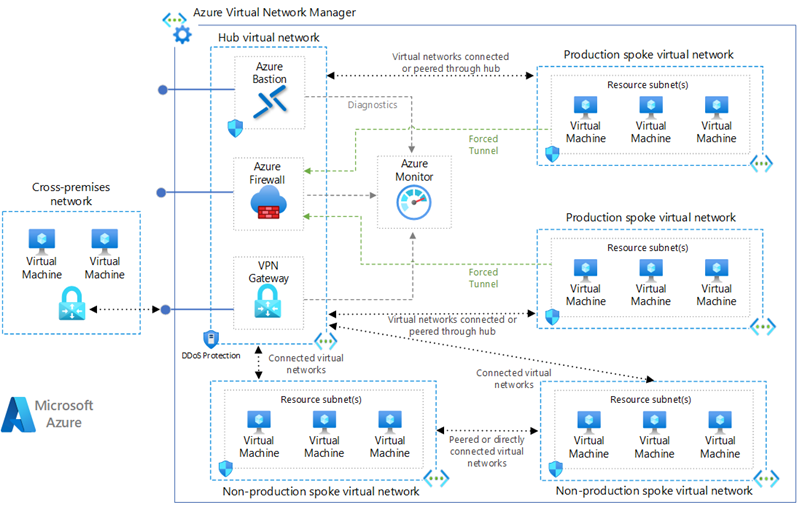
Hub-and-spoke topology in Azure is a network configuration that uses a central hub to connect multiple spokes. The hub is a virtual network (VNet) that acts as a central point of connectivity to many spoke VNets. The spokes are VNets that peer with the hub and can be used to isolate workloads while sharing services protected by the hub. This topology simplifies network management and reduces the potential for costly network traffic charges by keeping traffic within the Azure network.

Benefits of Hub-and-Spoke Topology
  • Centralized Management: Centralized resources like network virtual appliances and gateways in the hub.
  • Cost-effective: Reduces the need for redundant connections, thus minimizing costs.
  • Security: Centralized security services like firewalls or intrusion detection systems.
  • Isolation: Spokes can be used to isolate workloads, environments, or applications.
  • Scalability: Easy to add new spokes as the organization grows.
Components of the Hub-and-Spoke Topology
  1. Hub Virtual Network: Contains shared services like Azure Firewall, VPN Gateway, and Azure Bastion.
  2. Spoke Virtual Networks: Contains resources such as virtual machines (VMs) and are connected to the hub via VNet peering.
  3. VPN Gateway: Connects on-premises networks to the Azure VNet.
  4. Azure Firewall: Provides a centralized, network-level protection.
  5. Azure Monitor: Monitors the health and connectivity of the network.
  6. DDoS Protection: Protects the Azure resources from DDoS attacks.

Continue reading “Implementing a Secure and Scalable Hub-and-Spoke Network Topology in Azure with Terraform”

Automating Device Wipe in Microsoft 365 with PowerShell and Azure

In today’s digitally connected world, organizations often need to manage and secure their devices efficiently. This includes the ability to remotely wipe devices in case they are lost or stolen. Microsoft 365 offers powerful tools for device management and security, and with PowerShell and Azure, you can automate the process of wiping devices when needed.

In this blog post, we will walk you through a PowerShell script that utilizes Azure and Microsoft Graph API to search for a user and remotely wipe their devices if necessary. We will also include some Azure screenshots to help you visualize the process.

Prerequisites

Before we begin, make sure you have the following prerequisites in place:

    Azure AD App Registration: You will need to register an Azure AD App and obtain the AppID and AppSecret for authentication.

Wipe_01

    Microsoft 365 Tenant: You should have access to a Microsoft 365 tenant, and you’ll need to know the tenant ID (e.g., $Tenant = “YourTenantName”).

Microsoft Graph API: Make sure you have permissions to use the Microsoft Graph API and can authenticate with the provided App ID and App Secret.

Wipe_02

Continue reading “Automating Device Wipe in Microsoft 365 with PowerShell and Azure”

Automating AVD Restarts with Azure Functions

restart-computer

Azure provides an abundance of services tailored to ease the workload of IT professionals. One such remarkable service is Azure Functions, which allows you to run scripts or pieces of code in response to a variety of events. Today, we’ll explore how to leverage Azure Functions to run a PowerShell script that automates the restart of Azure AVDs based on a tag.

Understanding the Script

Before diving into Azure Functions, let’s understand the provided PowerShell script:

# Input bindings are passed in via param block.
param($Timer)

# Add all your Azure Subscription Ids below
$subscriptionids = @”
[
     “xxxxxxxx-xxxx-xxxx-xxxx-xxxxxxxxxxxx”
]
“@ | ConvertFrom-Json

# Get GMT Standard Time zone
$date = [System.TimeZoneInfo]::ConvertTimeBySystemTimeZoneId([DateTime]::Now,”GMT Standard Time”)
$now = $date

foreach ($subscriptionid in $subscriptionids) {
     # Selecting Azure Sub
     Set-AzContext -SubscriptionId $SubscriptionID | Out-Null

    $CurrentSub = (Get-AzContext).Subscription.Id
     If ($CurrentSub -ne $SubscriptionID) {
         Throw “Could not switch to SubscriptionID: $SubscriptionID”
     }

    $vms = Get-AzVM -Status | Where-Object {($_.Tags.RestartTime -ne $null)}
     $now = $date

    foreach ($vm in $vms) {
         if (($vm.PowerState -eq ‘VM running’) -and ($now -gt $(get-date $($vm.tags.RestartTime))) ) {
             Restart-AzVM -Name $vm.Name -ResourceGroupName $vm.ResourceGroupName -NoWait
             Write-Warning “Restarting VM – $($vm.Name)”
         }
     }
}

Continue reading “Automating AVD Restarts with Azure Functions”

Setting Up Custom Security Attributes with Microsoft Graph in Azure

Untitled design - 1

So, you’ve probably heard about custom security attributes in Azure AD, right? If not, let me break it down for you. Azure AD lets the cool tech folks (like you and me) craft our own attributes in the directory. Think of it as putting a custom sticker or label on certain users. Maybe you’ve got people working in specific departments or on particular projects? These custom attributes are like those name tags at networking events but way less awkward. And the best part? These can be a game-changer when you’re setting up stuff like conditional access policies.

Before diving deep, you’ll need the Microsoft.Graph module. It’s your gateway to all things Microsoft Graph when you’re in the PowerShell realm.

Alright, setting up a custom attribute. Graph isn’t going to hand-deliver this one, but here’s a workaround:

# First things first, connect to Graph
Connect-MgGraph


# Details for our new attribute
$attributeDetails = @{
     id = “customExtension_DepartmentCode”
     dataType = “String”
     targetObjects = [“User”]
} | ConvertTo-Json


# Now, make it real
Invoke-MgGraphRequest -Method POST -Uri “
https://graph.microsoft.com/v1.0/schemaExtensions” -Body $attributeDetails

Continue reading “Setting Up Custom Security Attributes with Microsoft Graph in Azure”

Creating a Self-Signed Certificates for Azure

OpenLock

When it comes to configuring applications or services that require SSL/TLS communication, having a self-signed certificate for testing or development purposes becomes almost indispensable. This is even more relevant when you’re dealing with services on Azure, where security is paramount.

Today, I’ll walk you through a PowerShell script that not only creates a self-signed certificate but also exports it in both .pfx and .cer formats.
Setting the Scene

Let’s start by defining some custom variables:

$friendlyName = “Azure SelfSigned Cert Name”
$subjectName = “CertificateName”
$certStorePath = “cert:\LocalMachine\My”
$exportPath = “C:\Temp\”
$passwordPlainText = “YourPasswordHere”

Here, $friendlyName is a descriptor for your certificate. $subjectName will serve as the Common Name (CN) for the certificate, and $certStorePath specifies the certificate store location in your system. Finally, $exportPath indicates where you want to save your certificate, and $passwordPlainText will be the password for your .pfx file.

Continue reading “Creating a Self-Signed Certificates for Azure”