Hey everybody,
Today I want to show you how to create an ODBC connection with UCCX, which can be mainly used for Wallboards/Dashboards.
To be able to access and pull information out from its Database, UCCX already provides some users with some specifics rights. They are:
- uccxwallboard: Has access to real-time database tables that contain snapshots of real-time statistics, more specifically to tables RTCSQsSummary and RTICDStatistics.
- uccxhruser: Has access to many configuration and historical tables in the UCCX database. It can only be used for custom historical reporting and Cisco Unified Workforce Management (WFM).
- uccxworkforce: Has access to the Team, Resource, and Supervisor tables and it’s used for Cisco Unified Quality Management (QM).
For this connection we are creating now, we are going to use uccxhruser.
Let’s start off going to UCCX >> Tools >> Password Management to set a new password (in case you don’t know)

Once done, let’s now focus on the ODCB configuration!
First of all, you need to download the IBM Informix Client SDK. It will allow the client to stablish a ODBC connection with your Database on UCCX.
You can download the SDK here.
- Go to Control Panel >> Administrative Tools >> ODBC Data Sources (64-bit).
- Chose the tab System DNS and hit Add.

- You see now a list of available data sources. Select IBM INFORMIX ODBC DRIVER. Click Finish.
- Time to create a new DNS. In the Tab General, give a name to your connection.

- Go to the Tab Environment, and fill the information following the rules below:
- Server Name: Instance name of Informix server of the set up. Please pay attention because there are tricky rules for entering the name such as:
- Name MUST be in lower case (even if your server name are in upper case)
- Any hyphens MUST be converted to underscore
- If your server name begins with a number, add “i” in front of it.
- Add “_uccx” to the end of the hostname.
For example: If your server name is 1-EMEA-UCCX, you have to enter i1_emea_uccx_uccx
- Hostname: The actual hostname or IP address of the UCCX
- Service: 1504
- Protocol: onsoctcp
- Options: leave it blank
- Database name: db_cra
- UserID: uccxhruser
- Password: Password of uccxhruser

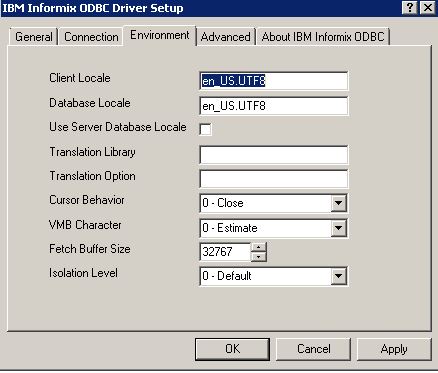
- Go now to the Tab Environment.
Fields Client Locale and Database Locale must be as: en_US.UTF8
- Go back to the Tab Connection. It’s now time to test if it’s working.
Click on Apply and Test Connection. You must see that message:

That’s it for now! I hope this post can be useful !!
See ya!!
Hello Bruno,
After that, how can I get information for this connection? Can I use for example Power BI desktop?
What would be an example of SELECT that can I use?
Hello Guillermo,
I’m sorry for my late response.
So in my case I prefer using Python to get the information.
You can run any SELECT and save information in variables. Honestly I’ve never tried with Power Bi yet.
You can get for example logged in agents ( Select LOGGEDINAGENTS from RtICDStatistics)
Or you can count CSQs ( Select count(*) from contactservicequeue where active =”t”)
I hope I answered your question,
Bruno
hello Bruno,
thank you for your useful post.
unfortunately, I tried to install Informix odbc driver but always installed with 32 bit not 64 bit which is mandatory for connection with uccx.
could you please guide me where I find Informix odbc driver 64-bit for Windows?
Hello,
Sorry for my delay.
I believe you can do some stuffs even with 32bit.
But, just in case you need, here is where you can download the 64 bit.
You just need to create a free account on IBM
https://www.ibm.com/resources/mrs/assets/packageList?source=ifxdl&lang=en_US
Thanks!!