Hey guys,
As promised in my post about ODBC Connection, (you can read it HERE), I’m going to show you how to create a basic Script using Python to query some information from UCCX, which can be useful to create some personalized Dashboards.
Even though we have many types of reports on CUIC, sometime they don’t meet our expectations by having too much unnecessary information or by lack of information.
I’ have decided to use Python, along with HTML, to create my own Dashboard. So I can have only information I know is 100% useful.
First of all, you have to create the ODBC connection to the server where you are going to place the script.
Again, you can use THIS POST to help you out.
Once you have the ODBC Connection working, it’s time to work on your script.
To be able to connect your script to your ODBC, you need to have a PYODBC python Library installed. To be able to better manipulate date and time, I’m also using datetime library.
The first part of the script is used to establish a connection to your ODBC. So you need to fill all its information in the connection strings. It’s important to mention that pyodbc does not even look at the connection string. It is passed directly to the database driver.
To start off my code, I’ll call the libraries and use the command conn = pyodbc.connect to connect to my ODBC.

Connection is now ready!
Now it’s time to choose a query to be sent. That query is sent using SQL commands.
This means you can use your SQL skills to play with queries and create interesting reports
![]()
In the below example, I wanted to know how many licenses are being consumed daily.
To do that, I’ll use the SQL command: ” {call sp_license_utilization(‘2021-05-05 00:00:01′,’2021-05-05 23:00:01′,’0′,’1’)}”. The line in the script will be like that:
cursor.execute(” {call sp_license_utilization(‘2021-05-05 00:00:01′,’2021-05-05 23:00:01′,’0′,’1’)}”)
If you print the result, you will see something like that:
[(datetime.datetime(2021, 4, 16, 0, 0, 1), 1, 0, 3), (datetime.datetime(2021, 4, 16, 1, 0, 1), 0, 0, 4), (datetime.datetime(2021, 4, 16, 2, 0, 1), 0, 0, 4), (datetime.datetime(2021, 4, 16, 3, 0, 1), 0, 0, 4), (datetime.datetime(2021, 4, 16, 4, 0, 1), 1, 0, 6), (datetime.datetime(2021, 4, 16, 5, 0, 1), 0, 0, 18), (datetime.datetime(2021, 4, 16, 6, 0, 1), 2, 0, 43), (datetime.datetime(2021, 4, 16, 7, 0, 1), 4, 0, 58), (datetime.datetime(2021, 4, 16, 8, 0, 1), 9, 0, 63), (datetime.datetime(2021, 4, 16, 9, 0, 1), 6, 0, 64), (datetime.datetime(2021, 4, 16, 10, 0, 1), 5, 0, 62), (datetime.datetime(2021, 4, 16, 11, 0, 1), 4, 0, 51), (datetime.datetime(2021, 4, 16, 12, 0, 1), 5, 0, 51), (datetime.datetime(2021, 4, 16, 13, 0, 1), 4, 0, 49), (datetime.datetime(2021, 4, 16, 14, 0, 1), 4, 0, 39), (datetime.datetime(2021, 4, 16, 15, 0, 1), 3, 0, 27), (datetime.datetime(2021, 4, 16, 16, 0, 1), 2, 0, 15), (datetime.datetime(2021, 4, 16, 17, 0, 1), 0, 0, 10), (datetime.datetime(2021, 4, 16, 18, 0, 1), 1, 0, 8), (datetime.datetime(2021, 4, 16, 19, 0, 1), 0, 0, 6), (datetime.datetime(2021, 4, 16, 20, 0, 1), 0, 0, 6), (datetime.datetime(2021, 4, 16, 21, 0, 1), 0, 0, 6), (datetime.datetime(2021, 4, 16, 22, 0, 1), 0, 0, 5), (datetime.datetime(2021, 4, 16, 23, 0, 1), 0, 0, 5)]
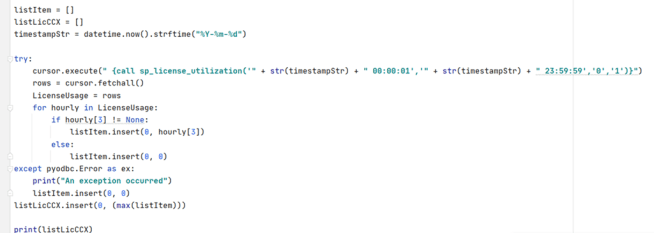
Then, use Python to manipulate the results according to your needs. In my case, I’m using the datetime to get today’s date. I also created a list to save the values, as this code will check the license each hour, and give me the maximum as a final result.
The full code for this sample is:
import pyodbc
from datetime import datetime
conn = pyodbc.connect(‘DRIVER={IBM INFORMIX ODBC DRIVER};’
‘UID=uccxhruser;PWD=123456;’
‘DATABASE=db_cra;’
‘HOST=uccxlab.com;’
‘SERVER=uccxlab_uccx;’
‘SERVICE=1504;PROTOCOL=onsoctcp;CLIENT_LOCALE=en_US.UTF8;DB_LOCALE=en_US.UTF8’)
cursor = conn.cursor()
listItem = []
listLicCCX = []
timestampStr = datetime.now().strftime(“%Y-%m-%d”)
try:
cursor.execute(” {call sp_license_utilization(‘” + str(timestampStr) + ” 00:00:01′,'” + str(timestampStr) + ” 23:59:59′,’0′,’1’)}”)
rows = cursor.fetchall()
LicenseUsage = rows
for hourly in LicenseUsage:
if hourly[3] != None:
listItem.insert(0, hourly[3])
else:
listItem.insert(0, 0)
except pyodbc.Error as ex:
print(“An exception occurred”)
listItem.insert(0, 0)
listLicCCX.insert(0, (max(listItem)))
print(listLicCCX)
And this is the final result:

Remember you can use any SQL Query!
For example, this is the SQL query to get a list of Agents by Team:select s.resourceLoginID,s.resourceFirstName,s.resourceLastName,s.extension, t.teamname from Resource s inner join team t on s.assignedTeamID = t.teamid where s.active = ‘t’ and t.active = ‘t’ and t.teamname = ‘UCCX_TEAM’ order by t.teamname, s.resourceloginid
Using a simple Select * from rtcsqssummary here csqname = ‘<CSQ Name>’ query you can display more information as this query will return the following information.
csqname
loggedinagents
availableagents
unavailableagents
totalcalls
oldestcontact
callshandled
callsabandonded
callsdequeued
avgtalkduration
avgwaitduration
longesttalkduration
longestwaitduration
callswaiting
enddatetime
workingagents
talkingagents
reservedagents
startdatetime
convavgtalkduration
convavgwaitduration
convlongestwaitduration
convlongestwaitduration
convoldestcontact
The sky is the limit!
![]()
Now that you now how to use SQL queries in Python, you can start creating your own script!
Enjoy!
Bruno


