Today I’m going to talk about a very useful feature which gives us power to control remotely a Deskphone, and even make calls from it.
First things first, you will need to install an extension to your Browser, to be able to control the phones.
If you are using Google Chrome, download the extension HERE.
If you are using Mozilla Firefox, download the extension HERE.
CUCM Configuration
With the Browser extension installed, let’s check now what do we need to do on CUCM.
It’s pretty easy!
Phone Web Access
Make sure the deskphone is enabled for Web Access. Go to the Device’s Page, scroll down till you see the Web Access option. It must be Enable.
NEW End User We could use any End User for that. But, as I’m centralize all requests in one user, I decided to create a new one only for that.
Each phone you want to control, you have to associate to that End User.
So, create a new user, associate as many phones as you want to Control, and add a Rule you have in your CUCM which gives them ability to control the phones.
Remote Control After installing the Browser extension, and configuring the Phone and End User, now it’s time to test the Remote Control.
Go to CUCM, find the Phone you want to access and get the IP Address (Phone must be registered)
PS: If you are controlling a phone which is MRA registered, you will need to be able to route to its real IP Address
As soon as you click on the IP Address, to access the Phone’s information, you will notice now something different. The option Control Me will be displayed.
Then, you will be asked to enter the Username and Password, from the End User we created above.
And now you have the Phone’s screen being displayed, with all available commands next to it.
From there, you can access the Settings, change configuration, and even Make calls…
Hope you enjoyed this quick, but useful and interesting Tip!
Coming back to the DEV topics, today I’m going to give you a quick overview of Unity API. It’s very simple, but it will give different perspectives of what you can automate on Unity.
CUPI is a provisioning API for Cisco Unity Connection that has been designed to be stable and simple to use. It is based on leading industry standards for web-based API development, and provides access to the most commonly provisioned data on Connection systems (users, contacts, distribution lists, and call handlers).
By using CUPI, you can securely do the following:
Create, read, update, and delete users and user configurations
Reset passwords
Create, read, and update distribution lists
Create, read, update, and delete call handlers
Create, read, update, and delete contacts
Getting the Schema Details
All the schema details for all supported object types can be obtained by going to the REST schema page using the URL: http://{server name}/vmrest/schema
In the case of users the schema shows what will come back when fetching the full user data using a URL like this: http://{server name}/vmrest/users/{object_id}
Authentication
CUPI uses the same authentication and authorization scheme that the administration console uses. This means that the objects an administrator has access to when authenticated are determined by the roles to which the administrator is assigned.
Basic Operations
Searching For an user: This request gives us all details about an specific user, searching it by the alias.
You can have your results in XLM or JSON. It’s up to you. The only difference will be on how you manipulate that, to achieve your goal. In XML, you will see this:
If you want to change, or create something new, you need to send a PUT or a POST request. And, depending on your request, you have to search the user via user-objectID, instead of Alias. In this case, you have to send a request to get information from an user, save its ObjectID, and then use it in another request. See some samples below:
Listing User PIN Settings Shows information about user’s PIN:
The following is the result of the above DELETE request: 200 OK
These were only some samples of what you can do using CUPI. Of course, there are dozes, or hundreds of types of request. Any specific request you want to do and don’t know how, let me know in the comments.
Today I’m going to change the Topic and talk about other thing…… which is the CME. I particularly like CME, and enjoy working on it
There is a feature on CME, which seems not to be so popular, but it’s really useful: B-ABC. In case you only have a CME in your IPT Infrastructure, B-ACD can easily be a good alternative for Cisco UCCX or Cisco Unity (for a basic IVR).
The only limitation we have is related to Codec. You must use same codec on incoming and outgoing dial peers when transferring calls.
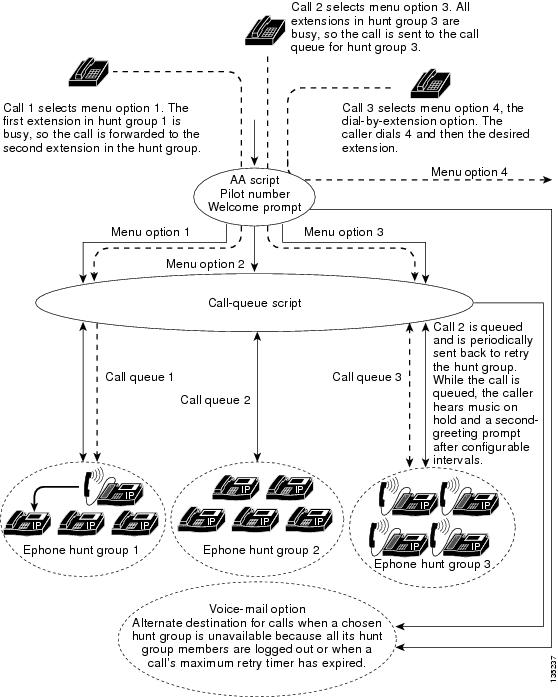
B-ACD is a Basic automatic call distribution (B-ACD) and auto-attendant (AA), and it provides:
Automatic answering of outside calls with greetings and menus that allow callers to select the appropriate department or to dial known extension numbers.
Managed call queues for hunt groups that route calls for different menu options.
Each Cisco Unified CME B-ACD application consists of one or more auto-attendant (AA) services and one call-queue service. From version 11.5 onwards, B-ACD introduces support for voice hunt group that includes SIP, SCCP, PSTN, and FXS.
Cisco Unified CME B-ACD Service Call Flow
Configuring Cisco Unified CME B-ACD
Downloading TCL Script and Prompts Download the Cisco Unified CME B-ACD tar archives to a TFTP server that is accessible to the Cisco Unified CME router (Download it HERE).
Go to your CME and extract it using this command: archive tar /xtract tftp://X.X.X.X/cme-b-acd-X.X.X.X.tar flash:
Dial Peer Let’s configure the dial-peer that will be used reach the Application we are going to create. I’m going to add 2 Dial-peers, as usually we have one only for all incoming calls, and the second one will be used to send the call to the application. Router(config)#dial-peer voice 11 pots
Router(config-dial-peer)#incoming called-number .
Router(config-dial-peer)#direct-inward-dial
Router(config-dial-peer)#port 0/1/0:15
Router(config-dial-peer)#forward-digits all
Router(config-dial-peer)#exit
Router(config)#dial-peer voice 222 voip
Router(config-dial-peer)#service aa ! — Enables AA service on dial-peer
Router(config-dial-peer)#destination-pattern 6000
Router(config-dial-peer)#session target ipv4:10.10.254.3
Router(config-dial-peer)#incoming called-number 6000
Router(config-dial-peer)#dtmf-relay h245-alphanumeric
Router(config-dial-peer)#codec g711ulaw
Router(config-dial-peer)#no vad
Hunt Groups In the below example, I’m creating Hunt Groups for SCCP phones. A maximum of ten hunt groups can be associated with Cisco Unified CME B-ACD call-queue service. The final command is not used with hunt groups that are part of Cisco Unified CME B-ACD services. Instead, the param voice-mail command specifies the alternate destination for calls that cannot be connected to a hunt group because all hunt-group agents are unavailable or because a hunt-group agent does not become available within the configured maximum retry time.
Queue Queues are responsible for routing the call to a Hunt Group and queue the call when members of the Group are all busy.
application service queue flash:app-b-acd-2.1.2.3.tcl! — Point to where you extracted the files param number-of-hunt-grps 3 ! — Max number of hunt groups param queue-len 15 ! — Size of the queue (1 to 30) param aa-hunt1 6100 ! — Option 1 – Goes to Hunt 6100 param aa-hunt2 6101 ! — Option 2 – Goes to Hunt 6100
Auto Attendant Time to configure the auto attendant part of the script.
application service aa flash:app-b-acd-aa-2.1.2.3.tcl ! — Point to where you extracted the files paramspace english location flash: ! – Defines the languages and where the files are paramspace english language en ! — Defines the code (en) to the audio files param service-name queue ! — Associate AA with the Queue we configured above param handoff-string aa ! –Specifies the name of the service param aa-pilot 6000 ! — Declares the Pilot Number (Must be the same as the Dial Peer) param welcome-prompt _bacd_welcome.au ! — Prompt of the Welcome Message param menu-timeout 5 ! — Sets the number of times the AA service will loop the menu prompt param dial-by-extension-option 9 ! — Enables callers to dial extension numbers after dialing the specified menu number param max-extension-length 4 ! — Restricts the number of digits that can be dialed param number-of-hunt-grps 3 param queue-overflow-extension 3999 ! — If queue is full, sends the call to 3999 param second-greeting-time 45 ! — Defines the time delay before the second greeting is played param call-retry-timer 10 ! — Assigns the time that calls must wait between retries to connect to a hunt group pilot number or to the alternate destination number. param max-time-call-retry 90 ! — This is the maximum period of time for which a call can stay in a call queue param max-time-vm-retry 2 ! — Assigns the number of times that calls can attempt to reach the alternate destination number. param voice-mail 3999 ! — Defines an alternate destination for calls that are not answered by a hunt group param send-account true ! — Generates call detail records for calls that are handled by B-ACD
Python Libraries (Zeep, urllib3 , requests – installed via PIP)
After installing Python and its libraries, let’s go to the codes!
To run my codes, I use PyCharm….but you can use any other software of your preference.
Firstly, you have to declare your libraries:
*Code will be passed at the end of the article
Now you have to enter your CUCM information, such as IP, username and password.
We are going to use ZEEP to create SOAP requests. In case of any fault, Zeep will show what SOAP envelope that was sent and the response from CUCM AXL.
If you’re not disabling SSL verification, host should be the FQDN of the server rather than IP.
To start with a simple request, I’ll show you how to list Phones.
Have in hands the Cisco DevNet AXL Schema Reference. It will help you to understand each request, which argument you must send as a searchCriteria and which arguments you must expect as returnedTags.
Only declared arguments in the returnedTags will be displayed. The rest will be showed as none.
For example, I want to list a phone, based on the Device Name, and want to have the arguments name, description, model and device pool being returned to me.
The code will look like this:
As I mentioned, if you don’t declare you want to have your argument being returned, it will be displayed as None.
Right. Now, you have to use your Python skills to take any action based on your output.
For example, if you want to isolate the returned tags to save them in a variable, you can use a For Loop to do something like that:
According to the Schema, you don’t have Search Criteria or Returned Tags in the addLine request.
So, the code you be like this:
This is the line we’ve just added:
As I always say…now, sky is the limit!
You can do whatever you want by following the Schema….like add/delete/list Phones, lines, Device Pool, Device Profile, etc, etc, etc…
Hope you liked it
See you!
Whole Code
from zeep import Client
from zeep.cache import SqliteCache
from zeep.transports import Transport
from zeep.exceptions import Fault
from zeep.plugins import HistoryPlugin
from requests import Session
from requests.auth import HTTPBasicAuth
from urllib3 import disable_warnings
from urllib3.exceptions import InsecureRequestWarning
from lxml import etree
transport = Transport(cache=SqliteCache(), session=session, timeout=20)
history = HistoryPlugin()
client = Client(wsdl=wsdl, transport=transport, plugins=[history])
service = client.create_service(binding, location)
def show_history():
for hist in [history.last_sent, history.last_received]:
print(etree.tostring(hist[“envelope”], encoding=”unicode”, pretty_print=True))
As promised in my post about ODBC Connection, (you can read it HERE), I’m going to show you how to create a basic Script using Python to query some information from UCCX, which can be useful to create some personalized Dashboards.
Even though we have many types of reports on CUIC, sometime they don’t meet our expectations by having too much unnecessary information or by lack of information.
I’ have decided to use Python, along with HTML, to create my own Dashboard. So I can have only information I know is 100% useful.
First of all, you have to create the ODBC connection to the server where you are going to place the script. Again, you can use THIS POST to help you out.
Once you have the ODBC Connection working, it’s time to work on your script.
To be able to connect your script to your ODBC, you need to have a PYODBC python Library installed. To be able to better manipulate date and time, I’m also using datetime library.
The first part of the script is used to establish a connection to your ODBC. So you need to fill all its information in the connection strings. It’s important to mention that pyodbc does not even look at the connection string. It is passed directly to the database driver.
To start off my code, I’ll call the libraries and use the command conn = pyodbc.connect to connect to my ODBC.
Connection is now ready! Now it’s time to choose a query to be sent. That query is sent using SQL commands. This means you can use your SQL skills to play with queries and create interesting reports
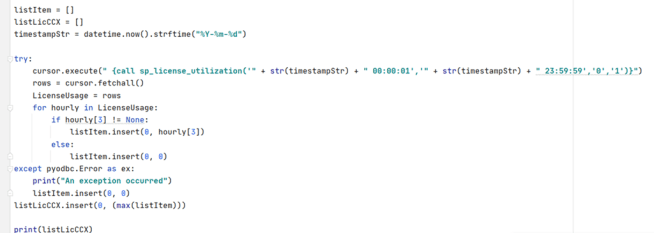
In the below example, I wanted to know how many licenses are being consumed daily. To do that, I’ll use the SQL command: ” {call sp_license_utilization(‘2021-05-05 00:00:01′,’2021-05-05 23:00:01′,’0′,’1’)}”. The line in the script will be like that:
Then, use Python to manipulate the results according to your needs. In my case, I’m using the datetime to get today’s date. I also created a list to save the values, as this code will check the license each hour, and give me the maximum as a final result.
For example, this is the SQL query to get a list of Agents by Team:select s.resourceLoginID,s.resourceFirstName,s.resourceLastName,s.extension, t.teamname from Resource s inner join team t on s.assignedTeamID = t.teamid where s.active = ‘t’ and t.active = ‘t’ and t.teamname = ‘UCCX_TEAM’ order by t.teamname, s.resourceloginid
Using a simple Select * from rtcsqssummary here csqname = ‘<CSQ Name>’ query you can display more information as this query will return the following information.